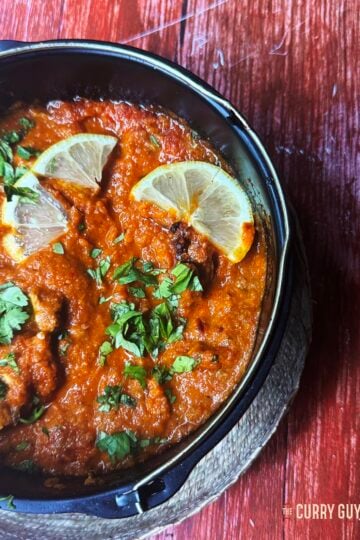
If you love a spicy, rich, tomato and onion based curry, you’ve probably enjoyed a Chicken Madras at your local curry house. But did you know that this British restaurant classic actually traces its roots back to Chennai (called Madras until 1996), the coastal capital of Tamil Nadu in southern India? The real Madras curry, known in India as Chennai Chicken Curry or South Indian Chicken is very different from what you’ll find in most British curry houses and today I’m going to show you how to make it.

What Is Chennai Chicken Curry?
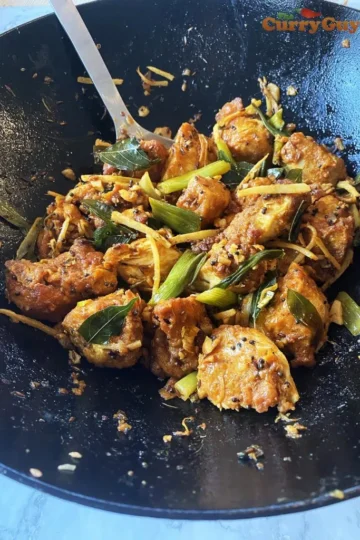
Chennai Chicken Curry is a spicy, aromatic South Indian curry made with chicken simmered in a sauce of onions, tomatoes, ginger, garlic, curry leaves, mustard seeds, and a blend of roasted spices.
It’s bold, rich and bursting with heat from fresh green chillies, dried red chillies and ground chilli powder, balanced beautifully by the tang of tamarind or the sweetness of coconut milk, depending on the regional variation.
While British Madras curries tend to be tomato-heavy and cooked with a base curry sauce or gravy, authentic Chennai Chicken Curry is cooked from scratch, using whole spices and fresh ingredients to build flavour step by step.
A Brief History of Madras Curry
The name “Madras curry” actually came from the British during the colonial era. When British traders arrived in the southern city of Madras (now Chennai) in the 1600s, they encountered a local style of cooking that used roasted spices and dried red chillies to make intensely flavoured sauces. They loved the flavours but couldn’t replicate them easily back home.
Over time, “Madras curry powder”, a blend of spices inspired by South Indian cooking, was created for export. This powder became a staple in British kitchens and, later, in curry houses. It was milder, simpler, and more uniform than the complex masalas used in India, but it introduced generations of Britons to the flavours of South India.
Fast-forward to the mid-20th century, and British Indian restaurants (mostly run by Bangladeshi chefs) began using “Madras curry” as the name of a hot, tangy, tomato-based curry. The result was delicious, but quite different from the original Chennai-style curries that inspired it.
Ingredients
There are quite a few ingredients in this one. Be sure to get them all laid out and ready before you start cooking. It's a lot easier that way! You will find the exact ingredient measurements for this Chennai Chicken Curry in the printable recipe card at the bottom of this page.

See recipe card for quantities.
Step by step photos
Below, you’ll see step-by-step photographs to guide you through the recipe. At the bottom of the page, you’ll also find the full recipe card, which includes the complete list of ingredients and written instructions in an easy, printable format.

- Step 1: Toast the spice powder spices in a dry frying pan until warm to the touch and fragrant.

- Step 2: Transfer to a plate to cool and then grind to a fine powder. Set aside.

- Step 3: Heat coconut oil in a large pan over medium to high heat. Add the mustard seeds and when they start to pop, add the curry leaves and let them sizzle for 20 seconds.

- Step 4: Add chopped onions and cook slowly until golden brown. This step builds sweetness and depth, so don’t rush it. It should take about 10 minutes. Add the garlic and ginger paste and the chopped and slit green chillies. Then sauté for another minute.

- Step 5: Stir in chopped tomatoes and cook until they soften and begin to break down. Add turmeric, cumin, coriander, Kashmiri chilli powder and your roasted spice blend. Cook until the oil begins to separate from the masala. This is your sign that your base is ready.

- Step 6: Add the chicken pieces, stirring to coat them well in the masala. Cook, covered for about 5–7 minutes, allowing the meat to seal and absorb the spices.

- Step 7: Pour in about 200ml (3/4 cu0) coconut milk. Bring to a gentle simmer and cook uncovered for 20–25 minutes, until the chicken is tender and the sauce thickens.

- Step 8: Season with salt to taste. Stir in garam masala and garnish with fresh coriander. Serve hot with steamed basmati rice.
Popular Variations of Chennai Chicken Curry
One of the joys of South Indian cooking is how flexible it is. You can easily adapt this curry for different tastes or dietary preferences.
- Chettinad Chicken Curry: A spicier Tamil Nadu variation made with black pepper, poppy seeds, and coconut.
- Coconut Chicken Curry: Add more coconut milk for a creamier, milder version.
- Tamarind Chicken Curry: Use one tablespoon tamarind pulp (concentrate) instead of coconut milk for a tangy, coastal flavour. Substitute the same amount of water or stock for the coconut milk.
- Vegetarian Madras: Replace chicken with aubergine, paneer, or mixed vegetables.
- Fish or Prawn Madras: Swap chicken for seafood and reduce cooking time for delicate results.
Useful Equipment
You don’t need much to make this dish, but a few tools can make a big difference:
Heavy-bottomed pan or kadhai: Essential for even heat distribution and to prevent burning.
Spice grinder: Great for making fresh spice blends or grinding roasted seeds.
Wooden spoon: Helps scrape the browned bits at the bottom of the pan for flavour.
Ladle: Perfect for stirring the curry without splashing.
Rice cooker: For consistently fluffy rice to accompany your curry. I use a Ninja Rice Cooker.
What do you serve with Chennai Chicken Curry?
One or two more south Indian curries would be a good place to start if you're cooking for a crowd. Why not try a few other popular South Indian style curries like Chicken Chettindad, Goan Chicken Curry, Kuzhambu Chicken Curry, Goan Chicken Vindaloo, Chicken 65, Kerala Lamb Curry, Kerala Fish Curry,
Rice Dishes: All of these side dishes will go great with this Chicken Madras (Chennai Chicken Curry) - Steamed Basmati Rice, Boiled Basmati Rice, Pilau Rice, Mushroom Fried Rice
Breads: Tandoori Naans, Tandoori Roti Chapatis Spiced Chapatis, Stovetop Naans
Dals: Chana Dal, Tarka Dal, Spinach Dal, Dal Makhani
Storage and Reheating
Storage
- Refrigerate: Store in an airtight container for up to 3 days.
- Freeze: Portion the curry into containers and freeze for up to 3 months. The flavours actually deepen over time!
Reheating
Avoid microwaving for too long, as it can make the chicken tough. Reheat gently on the stove over medium heat until piping hot.
Add a splash of water or coconut milk if the sauce thickens too much.
Top Tip
Bone-in Chicken Thighs: Use bone-in chicken thighs or a whole chicken cut into pieces instead of boneless chicken thighs. The curry will be more difficult to eat but the flavour bonus is substantial and more authentic.
FAQ
Coconut milk is common in southern coastal areas but not essential. Inland Tamil Nadu versions often use tamarind instead for tanginess.
Yes, but thighs are preferred because they stay tender and juicy even after long simmering. Breasts can dry out quickly.
You can, but the flavour won’t be quite the same. Curry leaves add a distinctive citrusy aroma that defines South Indian cooking. If you can’t find them, leave them out but do try to source them from an Indian grocer if possible.
Related
Looking for more South Indian curries?


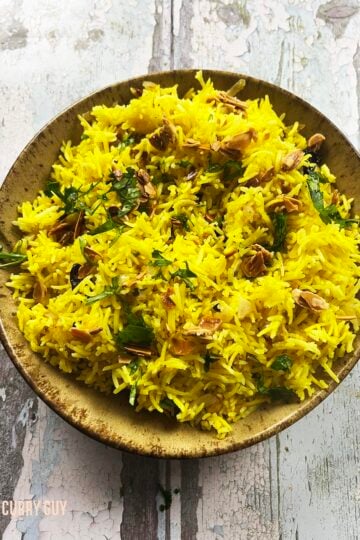
Pairing
Rice makes the perfect accompaniment for Chennai Chicken Curry.


Why You’ll Love This Curry
Authentic Chennai Chicken Curry is a celebration of bold South Indian flavours, smoky red chillies, aromatic curry leaves and the perfect balance of spice and savouriness. Unlike the simplified British Madras, this version feels alive, fresh, rustic and vibrant.
It’s the kind of curry that fills the kitchen with the aroma of toasted spices and bubbling tomatoes. Every spoonful tells a story of the region. It’s history you can taste.
Final Thoughts
While the Chicken Madras curry we know in Britain is a delicious creation in its own right, the original Chennai Chicken Curry offers something deeper and a glimpse into the roots of South Indian cooking.
It’s hot, yes, but balanced; fiery yet fragrant. Each ingredient plays its part, from the pop of mustard seeds to the silky finish of coconut milk and tangy tamarind.
So next time you’re craving that familiar Madras heat, skip the takeaway and cook it the authentic way. You’ll not only taste the difference, you’ll understand why this humble dish became a global curry icon.
Have you tried this Chicken Chennai Curry recipe?
If yes, please give it a star rating in the recipe card below and leave a comment. I love receiving your feedback and I’m sure other readers of my blog do too. Thank you.
If you are not already doing so, please follow The Curry Guy on Instagram and Facebook for all our latest recipes.
Chennai Chicken Curry
The original chicken Madras! If you like a spicy curry, you are going to love this Chennai Chicken Curry.
Ingredients
- FOR THE SPICE BLEND POWDER
- 1 tbsp fennel seeds
- 1 tsp black peppercorns
- 1 tsp cumin seeds
- 4–5 dried Kashmiri red chillies
- FOR THE CURRY
- 800g (1.75 lbs) chicken thighs, cut into bite-sized pieces
- 2 tbsp coconut oil or vegetable oil
- 1 tsp black mustard seeds
- 10–12 curry leaves
- 2 large onions, finely sliced
- 2 tbsp garlic and ginger paste
- 3 green finger chillies, finely chopped
- 2–3 green finger chillies, slit lengthwise
- 225ml (1/2 cup) chopped tomatoes
- 1 tsp ground turmeric
- 2 tsp coriander powder
- 1½ tsp cumin powder
- 1 tbsp red chilli powder (adjust to taste)
- 1 tsp garam masala
- 1 tsp salt (to taste)
- 200ml coconut milk
- 1 tsp tamarind pulp or concentrate
- Fresh coriander to garnish
Instructions
- Toast the spice powder spices in a dry frying pan until warm to the touch and fragrant. Transfer to a plate to cool and then grind to a fine powder. Set aside.
- Heat coconut oil in a large pan over medium to high heat. Add the mustard seeds and when they start to pop, add the curry leaves and let them sizzle for 20 seconds.
- Add sliced onions and cook slowly until golden brown. This step builds sweetness and depth, so don’t rush it. It should take about 10 minutes.
- Add the garlic and ginger paste and the chopped and slit green chillies. Then sauté for another minute.
Stir in chopped tomatoes and cook until they soften and begin to break down. Add turmeric, cumin, coriander, Kashmiri chilli powder and your roasted spice blend (if using). Cook until the oil begins to separate from the masala. This is your sign that your base is ready. - Add the chicken pieces, stirring to coat them well in the masala. Cook for about 5–7 minutes, allowing the meat to seal and absorb the spices.
- Pour in about 200ml coconut milk and the tamarind. Bring to a gentle simmer and cook uncovered for 15 minutes, until the chicken is tender and the sauce thickens.
- Season with salt to taste. Stir in garam masala and garnish with fresh coriander. Serve hot with steamed basmati rice
Recommended Products
As an Amazon Associate and member of other affiliate programs, I earn from qualifying purchases.


Nutrition Information:
Yield:
4Serving Size:
1Amount Per Serving: Calories: 1011Total Fat: 58gSaturated Fat: 16gUnsaturated Fat: 42gCholesterol: 261mgSodium: 2259mgCarbohydrates: 39gFiber: 6gSugar: 8gProtein: 80g


Paola Minekov says
Just what I was looking for tonight 🙂 Delicious!
Dan Toombs says
Great to hear. Glad you liked it.
Dan
Kayla Conley says
How long should I cook the chicken?
Dan Toombs says
Hi Kayla
The chicken needs to be cooked through. It should be hot and white in the centre. This can take up to about ten minutes but an even longer cooking time won't hurt.
Dan
Ben says
Hey Dan
Is this is any of your books?
Cheers
Dan Toombs says
This one isn’t in any book yet.
Thanks
Dan